Edit Timeline
This page has been automatically translated and has not been reviewed in detail yet. Therefore, the translation might not be completely accurate.

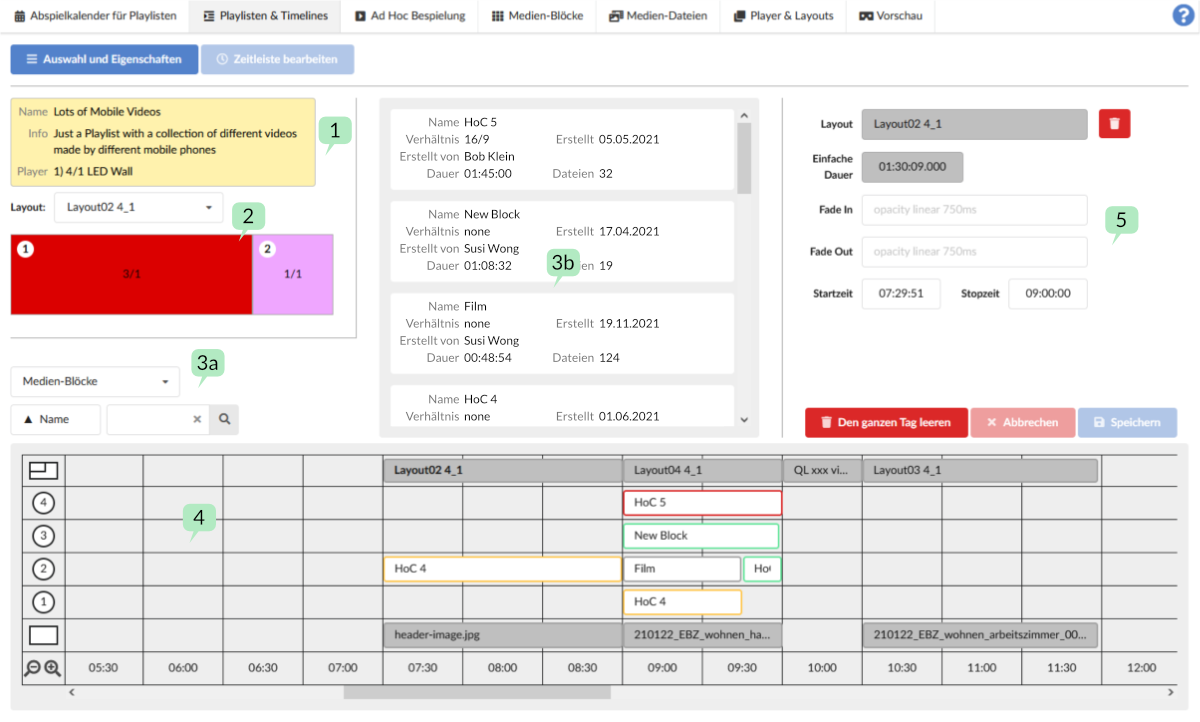
Information about the playlist 1
In the top left corner, information about the playlist, whose timeline can be edited here, is displayed again.
Playlist layouts 2
In addition, you can initially select one of the layouts that have been assigned to the playlist.
The visualization of the layout is then dragged and dropped into the top track of the timeline.
This creates the tracks in the timeline according to the frames in the layout. The tracks are displayed with the same numbering as the frames.
If you click on a place in the timeline where there is already a layout, this layout will be displayed here accordingly. This is for clarity as the tracks in the timeline correspond to the frames in the layout. More on that later.
Content selection 3a
Here you can choose which content is displayed in the content list 3b.
Possible content for the timeline in detail:
Media blocks
The media blocks created in the menu of the same name. These can be stored in the frame tracks in the timeline (see chapter Media Blocks).
Switchovers
Like layouts, switches can only be stored in the top track of the timeline. Switchovers send an event to the media control when they start and when they end. You can pass predefined parameters. These are used by the media control (if it is programmed accordingly) to display external content. This may involve routing signal paths, switching input sources or even starting external software.
If 'Switchovers' is selected, a 'New' button also appears to create switchovers. Switchovers that already exist can be edited in the list using the pencil symbol.

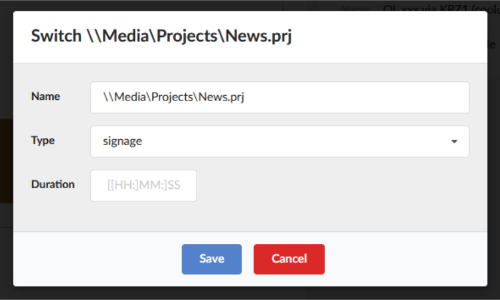
The Name field can be filled freely. For example, a path and project name can be specified here. If the media control is configured accordingly, the external application project can be loaded.
The 'Type' offers another option for switching sources via the media control. For example, it makes sense to specify path and type in combination in order to be able to carry out different hardware routings in the media control under certain circumstances.
In the optional 'Duration' field you can preset a time that indicates a switch in the timeline. However, this can be changed at any time in the timeline.
Dialog for creating or editing 'switchovers':

Tag blocks
Using appropriate information, tag blocks can automatically select content to play.
Create a new tag:
3a If you have selected 'tag blocks' as the source, content selection 3b appears in the content list the already created tag blocks.
To the right of the source selection, click the 'new' button to create a new tag block.
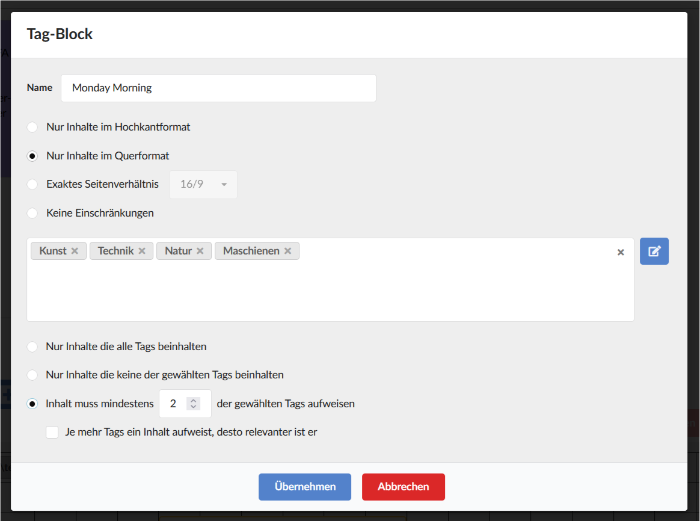
Dialog for creating or editing tag blocks:

First, the tag block must be given a unique name.
All other settings are used to specify content. The system then uses the set parameters to find all known content that corresponds to the parameters. The system then plays this content one after the other for the length of the respective timeline entry.
Backgrounds and images
As the name suggests, this source selection is used to display images or backgrounds in the content list so that they can be used in the background track of the timeline.
Working with the timeline
The timeline is closely linked to a layout. The top track is therefore also reserved for layouts. Switchovers are an exception. However, if you use a switch in the top track, you cannot assign any frame tracks.
Layouts are simply dragged and dropped into the top track. Below are the frame tracks. These are given the same number as the corresponding frames in the layout.
At the bottom is the background track.
Actors in the timeline can be moved left and right. This changes the start time of the actor, but the length remains the same.
If you hold the mouse cursor over the beginning or end of an actor, the mouse cursor changes to a left/right arrow and you can change the length of the actor by pressing the mouse button. This changes the start time and stop time of an actor.
5 These and other settings can also be entered manually.
Timeline cast color coding

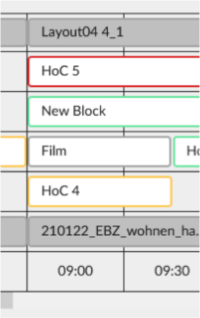
Layouts (top track) and background images (bottom track) are displayed in gray.
The actors in the frames can be outlined in color.
Gray border
The time length of an actor, e.g. a media block, corresponds exactly to its native length. So if there are 10 films in the media block, each film will be played once.
Green border
The actor is elongated exactly several times. With 10 films in a media block, each film is played exactly x times, without leaving out films at the end or cutting off a film at the end.
5 The 'Current Duration' of an actor is an integer multiple greater than the 'Simple Duration'.
This is best set using the two arrow keys.
Yellow border
If an actor has a yellow border, it is extended by a non-integer multiple. That means e.g. B. not all films are repeated and/or a film is cut off at the end.
Red border
The actor is shorter in the timeline than its 'Simple Duration'. That means e.g. B. not all films are played and/or a film is cut off at the end.
Detailed view for timeline actors 5
Depending on the selected actor type, settings can be made here or the actor can be removed from the timeline using the trash can icon.
Fields with a gray background cannot be edited. The fields highlighted in white can be edited. Here, for example, the start time and stop time can be set to the exact second.
Position content in frames
Since it sometimes happens that content has different aspect ratios than the frame in which it is played, you can, for example, set for a media block how to proceed in such a case. The setting is only a rough default, as there can be many different combinations of aspect ratios. Therefore, the player tries to either center the content in the frame, place it on the left or top, right or bottom depending on the aspect ratio, or enlarge the content to fit the frame, which is of course the most inappropriate option in most cases.
Example of ‘content left or top’:
Save and Cancel
Once you have made all the settings, all changes must be applied using the 'Save' button.
Using the ‘Cancel’ button, all changes are discarded.
Using the 'Empty all day' button, all content is removed from the timeline.
Note! If a playlist and its timeline are currently being played, the changes made when saving do not affect the current playout. However, if the playlist is reloaded, e.g. B. the next day, then the updated version will be used.