Connecting an Arduino device to NeuroomNet using the provider / API “Software API”
This page has been automatically translated and has not been reviewed in detail yet. Therefore, the translation might not be completely accurate.
Preliminary remark
To understand this chapter, reading the following documentation may be useful:
- Strongly recommended: components, actions, events: Link to introductory chapter
- Recommended if you want to remotely control components such as Arduino yourself using NeuroomNet / Software API: Link to the software API documentation
Introduction
The main task of NeuroomNet is the central remote control of other devices / hardware (i.e. "components" in NeuroomNet terminology), which can be reached via various communication channels, such as a TCP/IP based network. There are many available interfaces for this, such as KNX, DMX, PJLINK, or a simple text message-based TCP/IP or UDP communication can also be set up - via so-called PRT configuration files.
If another device is controlled by a microprocessor that can be programmed or is more or less a “PC in the network”, then it is recommended to use another interface to define your own communication protocol: the so-called “Software API” from NeuroomNet. This is presented below using a practical example and is particularly recommended for
- Software on “real” PCs
- Software on Raspberry Pi
- Software on Arduino
- Software on NodeMCU
- And all other programmable devices that can receive and send text messages via TCP
Brief description of the software API
Communication via the “Software API”, through which NeuroomNet can control software on devices accessible in the network (hereinafter referred to as components or clients) and exchange information, works as follows:
Overall, communication runs via the TCP protocol (https://en.wikipedia.org/wiki/Transmission_Control_Protocol) and therefore has the following properties:
- Once a connection has been established (through a specific handshake) between the NeuroomNet server and a client, it remains active
- As long as the connection exists, both sides can send messages to the other side (full duplex)
- If the connection is interrupted from one side (or by the network), no more messages can be sent, but the connection must first be reestablished
In the following we use the terms server and NeuroomNet synonymously as well as client and component (end device).
For NeuroomNet / Software API specifically, connection and communication takes place using the following principles:
- A technical TCP connection is always initiated by the client (the default port on the NeuroomNet side is port 15400)
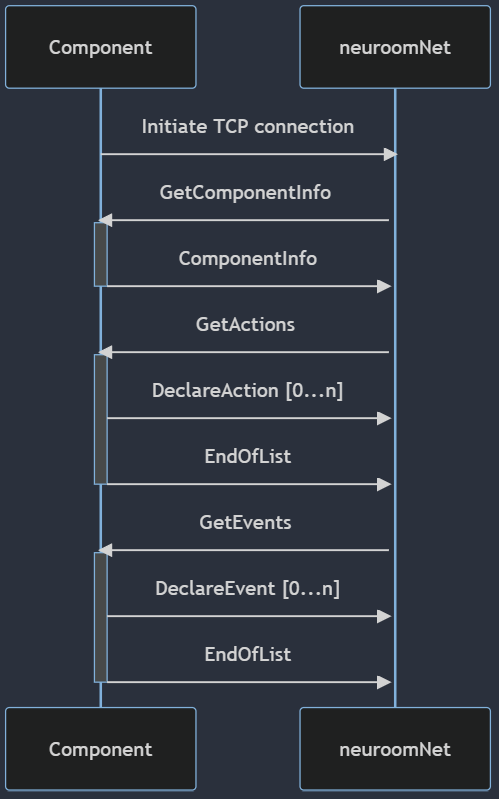
- After technical initiation of the connection, communication takes place according to a specified content protocol, the "registration of the component to NeuroomNet" (regardless of whether there has already been a connection between the client and NeuroomNet server before):

With this protocol for registering the component to NeuroomNet, the following is achieved:
- NeuroomNet and the component agree on a protocol version (usually the most current one that both can handle)
- NeuroomNet is informed about actions and events available in the component, so that these are then also available in NeuroomNet, for example in the monitoring and script blocks modules
All messages between the component and NeuroomNet are sent as text (possibly as a JSON structure), although the first 4 bytes of each message must correspond to the size of the message (size specifically means the number of bytes of the complete message encoded in Little Endian).
After the component has been registered, NeuroomNet can then send messages of the following types to the component at any time:
- GetStatus
- DoAction
To do this, the component can send messages of the following types to NeuroomNet at any time:
- Status (to answer a received GetStatus request, but can also generally always be reported proactively)
- DoEvent
- Log (for entering log lines in NeuroomNet logs of the monitoring module)
A detailed description of the Software API is available via the following link: (Software API 1.0 Provider)
Example: Arduino-based environmental sensors connected to NeuroomNet
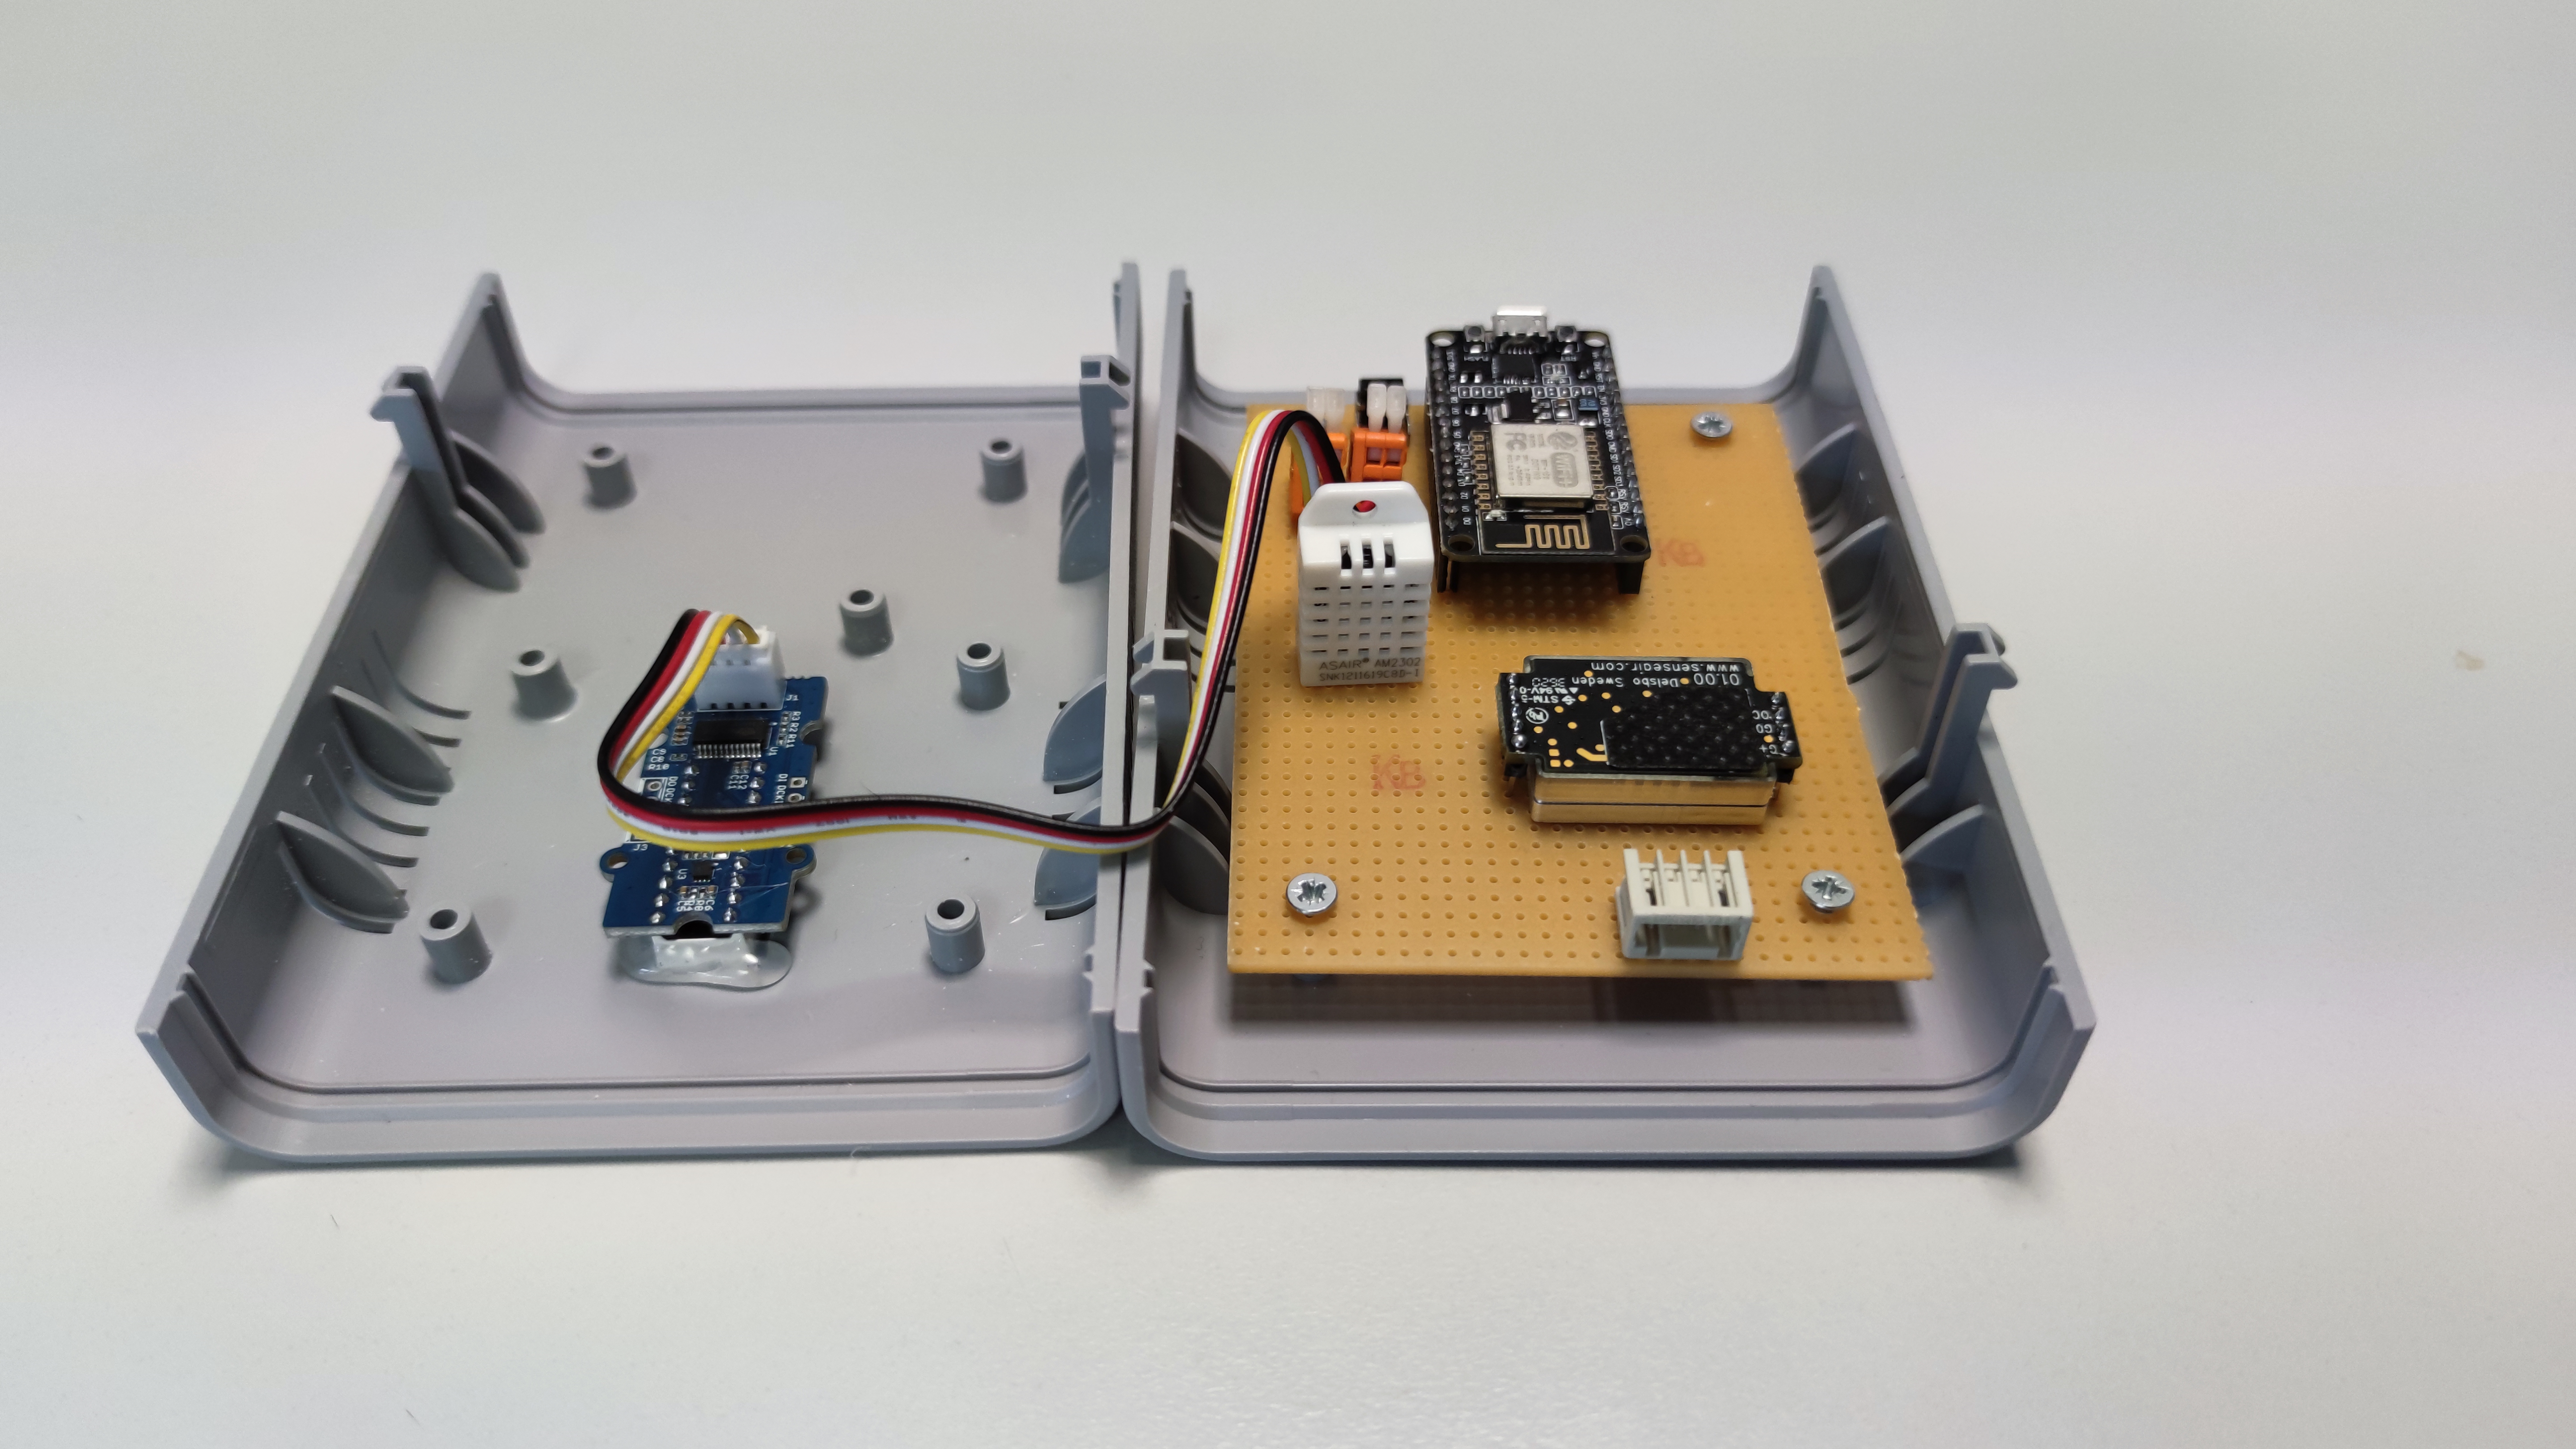
The use of the “Software API” interface is shown using the example of a self-assembled environmental sensor component:

This environmental sensor component consists of an ESP8266 / Arduino and contains 4 different environmental sensors for determining the CO2 content in the air, air temperature, air humidity and soil moisture. This component automatically sends its data to NeuroomNet via the software API when a threshold value for the respective sensors is exceeded.
The following actions and events have been defined for this purpose:
- Actions:
- "Send_All_Environmental_Data" should cause all current values of all sensors to be sent
- Events:
- "CO2": Transfer of the current CO2 content in the air as an integer (number)
- "Temperature": Transmission of the current temperature as an integer (number)
- "Humidity": Transfer of the current humidity as an integer (number)
- "Moisture": Transfer of the current soil moisture as an integer (number)
Note: In the current version of the software API (1.0) there is no direct concept of content request / response in the sense that NeuroomNet sends a request to an external component and then expects a specific response. However, this is usually not a significant restriction because this can be represented by actions and events as in this example: The action "Send_All_Environmental_Data" initiated by NeuroomNet then causes the events "CO2", "Temperature", "Humidity" to be sent promptly. and "Moisture", which are, so to speak, the answer to the "Send_All" action.
With the following C++ code for Arduino, the connection to NeuroomNet can be established and the incoming messages can be checked and responded to in an endless loop (note: most incoming messages concern the connection establishment):
#include <WiFi.h>

WiFiClient wiFiClient;

void sendMessage(String message) {
    int32_t messageLength = message.length();
    wiFiClient.write((uint8_t *)&messageLength, sizeof(messageLength));
    wiFiClient.write(message.c_str(), messageLength);
}

String readMessage() {
    uint32_t messageLength = 0;
    wiFiClient.read((uint8_t *)&messageLength, sizeof(messageLength));

    if (messageLength > 0) {
        char message[messageLength + 1];
        wiFiClient.readBytes(message, messageLength);
        message[messageLength] = '\0';

        return message;
    }
    return "";
}

void setup() {
    WiFi.begin("SSID", "Passwort");
    if (WiFi.waitForConnectResult() != WL_CONNECTED) {
        Serial.println("WiFi Connect Failed! Rebooting...");
        delay(1000);
        ESP.restart();
    }

    // Connect to NeuroomNet
    wiFiClient.connect("192.168.x.x", 15400);
}

void loop() {
    if (wiFiClient.available()) {
        String message = readMessage();

        /////////////////////////////////////////////////////////////////
        // React to incoming requests regarding the logon workflow
        if (message.indexOf("GetComponentInfo") > 0) {
            sendMessage("ComponentInfo\tapiVersion\t1.0\tdisplayName\t<NAME>\tid\t<ID>\tstatus\t<STATUS>\ttype\t<TYPE>");

        }
        else if (message.indexOf("GetActions") > 0) {
            sendMessage("DeclareAction\tid\tSend_All_Environmental_Data");
            // ... more actions

            sendMessage("EndOfList");

        }
        else if (message.indexOf("GetEvents") > 0) {
            sendMessage("DeclareEvent\tid\tTest"); // <- Example without parameters
            sendMessage("DeclareEvent\tid\tCurrentCO2\tparameters\tid\tCO2\trequired\ttrue\ttype\tInt");
            // ... more events

            sendMessage("EndOfList");

        }
        /////////////////////////////////////////////////////////////////
        // React to incoming requests outside the logon workflow
        else if (message.indexOf("GetStatus") > 0) {
            sendMessage("Status\tstatus\t<STATUS>");

        }
        else if (message.indexOf("DoAction") > 0) {
            if (message.indexOf("Send_All_Environmental_Data") > 0) {
                // do stuff here
            }
        }
    }

    if (WiFi.waitForConnectResult() != WL_CONNECTED || wiFiClient.connected() == 0) {
        Serial.println("Disconnected! Rebooting...");
        delay(1000);
        ESP.restart();
    }
}
For example, we can send an event about a new CO2 value to NeuroomNet as follows:
sendMessage("Event\tid\tCurrentCO2\tCO2\t<VALUE>");
Now the status of the environmental sensor component (online / offline) can be tracked in NeuroomNet's monitoring module and you can, for example, create a dashboard that shows the current values of the sensor and where you can also request the latest values using a button :
 ]
]
Conclusion
Using NeuroomNet's "Software API" and TCP, Arduino devices or other programmable devices can be easily integrated into NeuroomNet as components. Once integrated, NeuroomNet can
- trigger actions in these devices,
- react to events,
- Show the device in the monitoring module including status and logs
- use the device in dashboards and script blocks
- [switch the device on and off, whereby this would be done via other components such as a KNX socket or PC client and/or via a specially defined action]