Module KNX Administration
Introduction
KNX is a system for building automation (old designation EIB). Actuators and sensors are connected via the bus using a two-wire cable.
Sensors are, for example, switches, dimmers, motion detectors or temperature sensors. Actuators can be lamps, blinds or dimming actuators, for example. If a sensor now sends a telegram to the bus, the correspondingly ‘programmed’ actuator recognises that it is meant and behaves accordingly, for example switching on the light.
NeuroomNet can communicate with devices in a KNX network by tunnelling into the KNX network via a KNX interface (also known as a KNX gateway or bus coupler). Such a KNX interface is a physical device that can be addressed in the normal intranet via an IP address.
Note: Some aspects of the KNX standard are manufacturer-specific and may vary. In order to physically make devices available in a KNX network, a specialist (electrician) is usually required and the use of the ETS software. Depending on the setup of the KNX network, so-called filter tables and other special features may also be required. The configuration on the NeuroomNet side is relatively simple in itself, but an already functioning KNX network is required (into which the NeuroomNet server dials in via a KNX interface, so to speak).
Special feature of the management and in particular integration of KNX interfaces and KNX devices in NeuroomNet
Most device types are added directly in NeuroomNet as components via Module Setup. This is slightly different for KNX devices (and KNX interfaces): KNX devices (and interfaces) are added via the KNX Administration module 1:
Devices created (or otherwise edited) in the KNX Administration module are then available in the Setup module and other modules.
KNX Interfaces tab
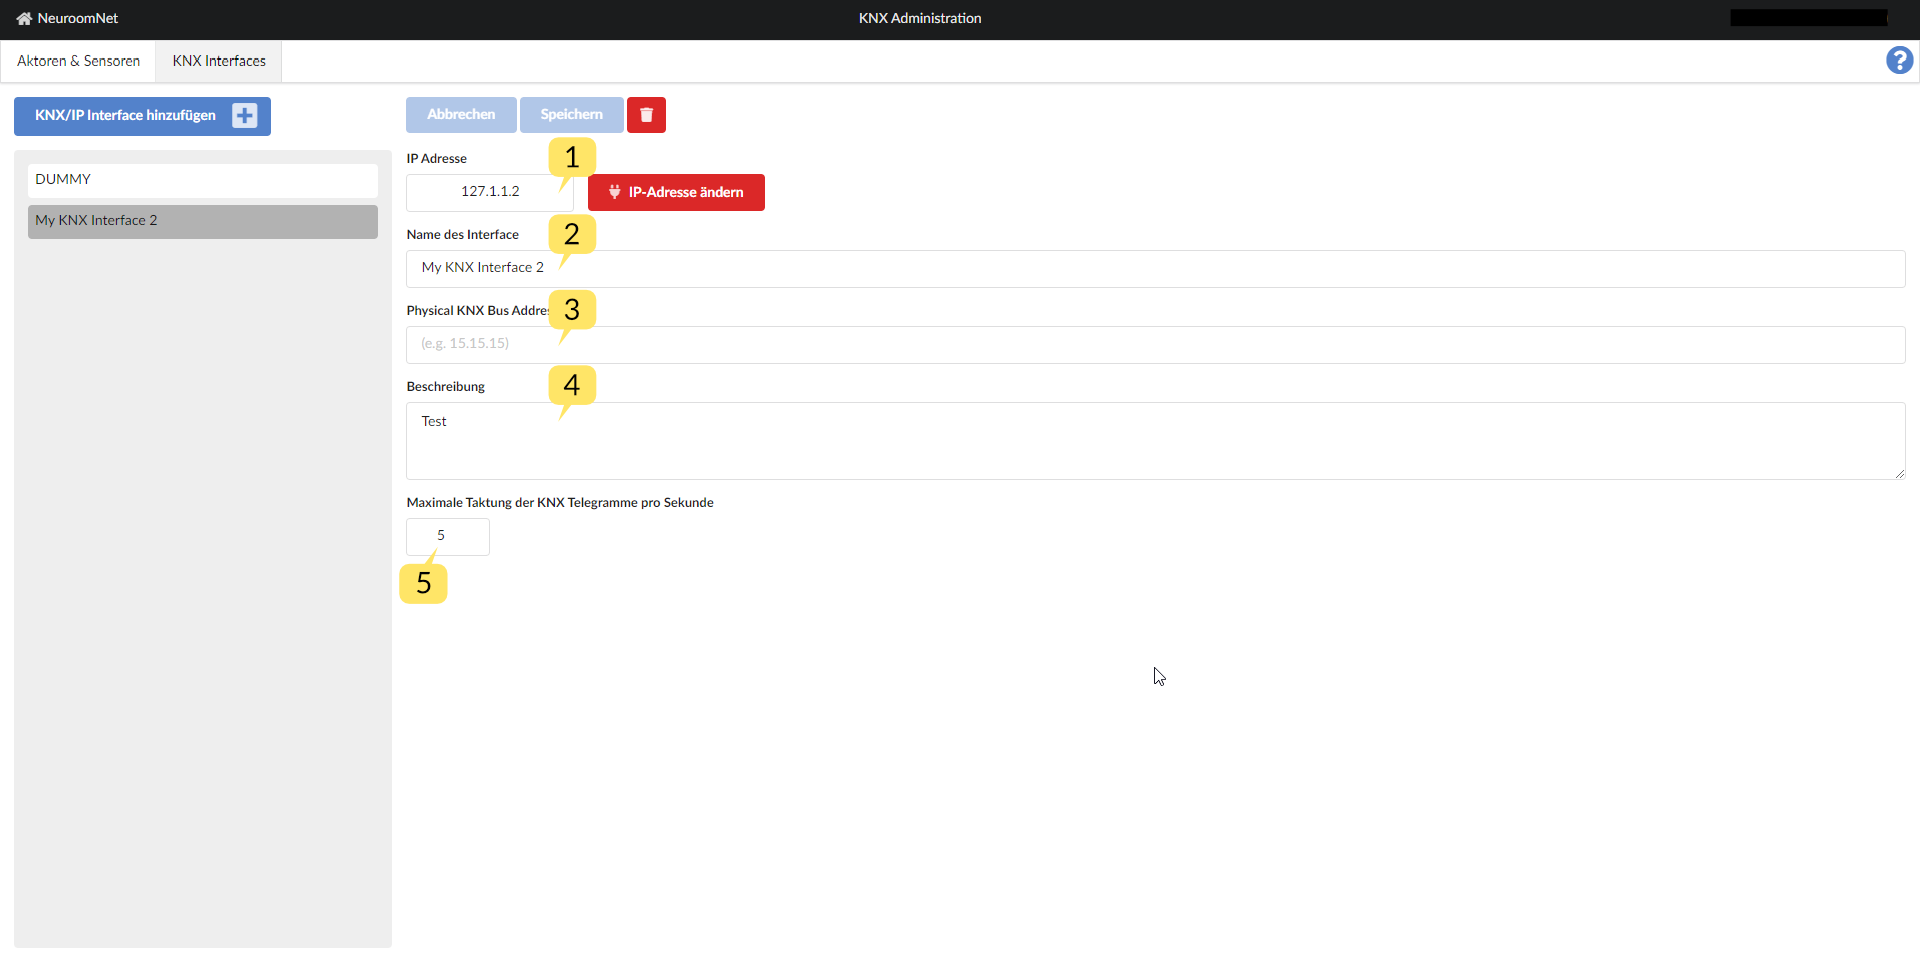
KNX interfaces can be added, edited and deleted in the KNX Interfaces tab:

KNX interfaces can be added, saved, deleted or changes that have not yet been saved can be cancelled (‘Cancel’ button) using the usual buttons at the top.
The meaning of the individual fields of a KNX gateway is as follows:
- IP address 1: IP address of the KNX gateway in the intranet
- Name of the interface 2: User-defined name for the KNX interface (any free text name, should be unique)
- Physical KNX Bus Address 3: Currently not used, can/should be left blank.
- Description 4: Any (free text) description of the KNX interface
- Maximum clocking of the KNX telegrams per second 5: Maximum number of KNX telegrams that may be sent per second (corresponding queuing takes place afterwards)
By default, integrated KNX interfaces (or underlying devices) are addressed via the so-called KNX IP tunneling protocol. Since NeuroomNet version 2023.3, control via the so-called KNX IP routing protocol is also possible (if the KNX interface supports it), which enables increased performance (i.e. more telegrams can be sent per second). To activate this KNX IP tunneling protocol, settings are required in the backend. If necessary, please contact NeuroomNet.
Actuators & Sensors tab
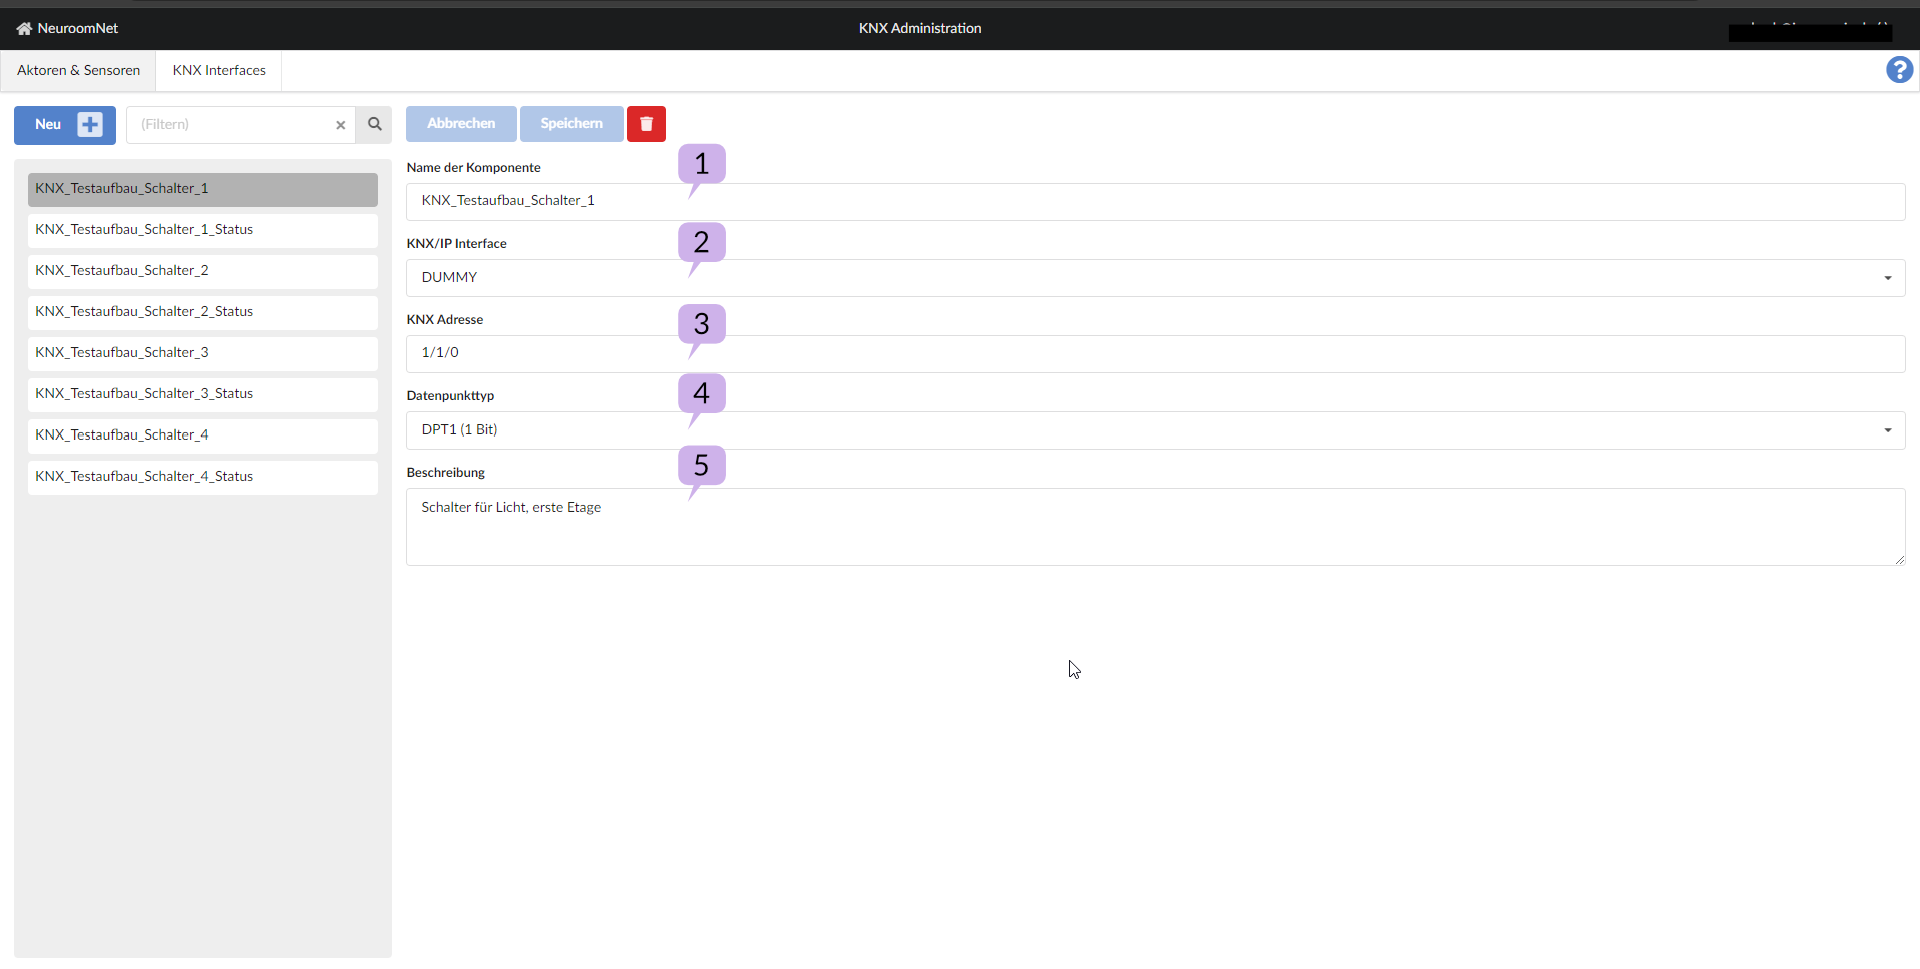
In the Actuators & Sensors tab, KNX devices (actuators and sensors) of a KNX network (which is accessible via one of the KNX interfaces from the "KNX Interfaces" tab) can be added, edited and deleted:

Using the usual buttons in the upper part, KNX interfaces can be added, saved, deleted or changes that have not yet been saved can be discarded (“Cancel” button).
The meaning of the individual fields of a KNX gateway is as follows:
- Name of the component 1: Custom name for the KNX interface (any free text name, should be unique)
- KNX/IP Interface 2: The responsible KNX interface for the device (one of the KNX interfaces can be selected here using the combo box)
- KNX address 3: Address of the actuator / sensor in the KNX network (this address usually comes from the electrician / ETS system)
- Data point type 4: Selection of the address length of the data point (1 - 16 bit selectable)
- Description 5: Any (free text) description of the KNX interface
Other information on the use of KNX components
Status of KNX components
The status of the KNX components (actuators and sensors) goes to "online" (visualized in green in the Setup and Monitoring modules) when NeuroomNet can reach the associated interface. As soon as the TCP connection to the interface is lost, all associated components go offline.
This means, in contrast to TCP/IP components, the status (green or red) does not indicate whether the component is currently switched on or off, but rather whether the associated KNX interface can currently be controlled.
Actions of KNX components
After KNX components have been created, they can be inserted into a group like any other component in the Setup module (which then also makes them visible in the Monitoring module).
KNX components have 2 actions in NeuroomNet:
- Send Data to Actor
- Query current value
The "Send Data to Actor" action sends a number of bits specified in the "Data point type" field for the component to the device. The data point type and what the specific transmission of the bits does is device-specific:
For a simple light KNX device, the data point type would be "DPT1 (1 bit)" and sending "0" would correspond to switching off the device and "1" to switching it on.
The "Query current Value" action is aimed primarily at KNX sensors, but can also be sent to actuators that can send a value: Here the device is asked to send back a value, which also corresponds to the data point type specified for the component. The response arrives in NeuroomNet as the event “Data received from Sensor”, see the following section. Whether the respective device sends something back and the meaning of the returned value are device-specific.
For example, a light KNX device could respond to the “Query current Value” action with an event that receives the value 1 exactly when the light is switched on and 0 otherwise.
Events from KNX components
KNX devices, usually not exclusively sensors, can send an event of the type “Data received from Sensor” to NeuroomNet at any time, or in particular in response to a “Query current Value” action.
This event contains the number of bits specified in the data point type of the KNX component and the meaning of the bits is device-specific.
For example, a temperature measurement sensor could send the value of the current air temperature as a signed 8-bit integer.
This event can be responded to accordingly in script blocks (a corresponding component event would then be used on the left / event page).
Tips
The following basic tips are often useful, especially for KNX components.
Create and manage custom component types
If you have many KNX components and many are of the same type, then it makes sense (especially for an improved overview) to create corresponding user-defined component types such as:
- Light
- Power outlet
In addition to the better overview, so-called aliases can also be defined for actions for user-defined component types.
See Module Setup / Component Types Tab for an explanation of this.
Aliases for actions
For user-defined component types (see previous section), aliases can also be defined with descriptive names for the combination of "Send Data to Actor" and a specific parameter value, such as "Switch on light" for a user-defined component type "KNX light" with alias " LightOn", which stands for "Send Data to Actor" with parameter value "1". These aliases can then be used, for example, in the Setup module instead of the general “Send Data to Actor”.
See Module Setup / Component Types Tab for an explanation of this.